| About Us | Contact Us | Testimonials | File Specs. | Printing 101 | Find Designer | Templates | Glossary | FAQ | Login |

|
|
 US Website
  Canadian Website
Creating PDF Files - Instructions
Save Output Of Your File As Adobe PDF
To Save Your Source Files To PDF, Follow These Instructions.
Image |
Instruction |
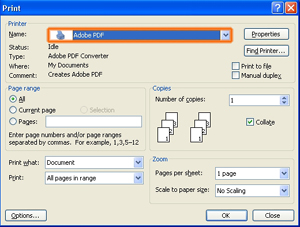 |
1. Once your project is ready to send to PrintOutlet, activate your printing procedure from the program that you are using. NOTE: normally on the PC, the shortcut for this is "Ctrl" + "P" or uner the "File->Print" Menu. 2. Choose the Adobe PDF as the Printer Name in the dialogue box that opens. NOTE: The printer window may look different than the one shown, but the "Printer Name" choice will be available. |
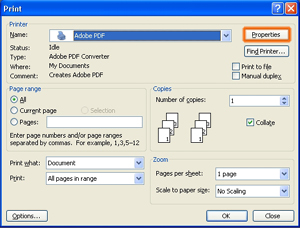 |
1. Now press the "Properties" Button to go to the properties page so we can set the page size and the resolution of the file to be created. |
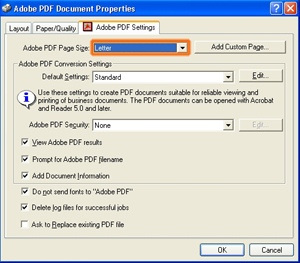 |
1. Notice that the "Letter" size is already chosen here, you may have some other size chosen. If the project you are working on is a Letter size, then go to the next step, otherwise choose the correct size of the project you are working on and then go to the next step. 2. If your project size in not in the listed image sizes then you will have to introduce a custom size to the list. Follow this link to the instructions for the custom size. |
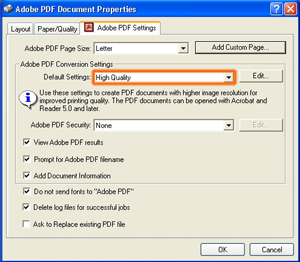 |
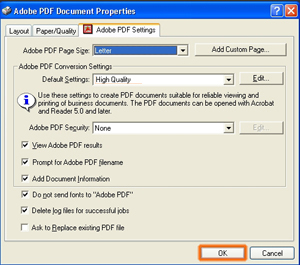
1. As we require high resolution files for printing, we will now set the resolution level of the output of the Adobe PDF File. 2. The setting for the converstion setting should be set for "High Quality" as shown in the image on the left where the "Default Setting" is for the PDF Conversion Setting. |
 |
1. That's all there is to setting the size and the resolution. 2. Now we are ready to go ahead and print. Clike the "OK" button to proceed to print.
|
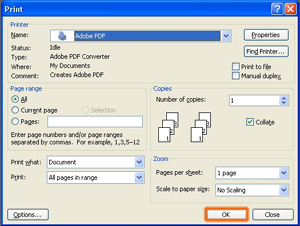 |
1. Now that we have set up the printer, the size and the resolution, all there's left to do is write the Adobe PDF file. 2. Press the "OK" Button as shown and the process of creating the Adobe PDF is under way.
|
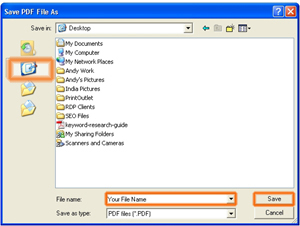 |
1. A Window will open to ask you for a name for your file, and the location to save the file so you can easily find it. 2. Best practice here is to save it on the desktop. Choose the Desktop icon on the left panel of the window that has openend. 3. At the bottom of the window, as circled enter a name for the file you are saving as Adobe PDF. This is the name that the PDF File be and it will be saved on the desktop (unless if you decided to save it elsewhere). Next press the "Save" button to proceed. 4. We recommend that you name the file with your project name, and your company name or your personal name. If you have already placed your order with PrintOutlet, then it would also be a good idea to include the "Order No" from your confirmation slip sent to you when you placed the order on our website. |
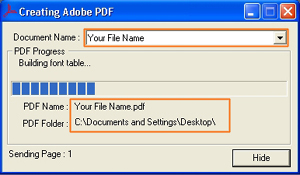 |
1. A window will now open on your screen, identifying the process of the creation of the Adobe PDF, and its progress. 2. You will note the file name and the destination of the file on this window. 3. This process does not take too long for normal files, but may take longer for larger projects. If you want to press the "Hide" button on the window, you may, so that you can now carry on with other work on the computer. |
 |
1. An icon similar to the one on the left will be visible on the desktop when you Adobe PDF file is ready. 2. Please double click and open the file, if it does not open automatically, and view the file with care to and attention to proof the following items:
3. Now the Adobe PDF file is proofed and ready to upload. Please click "Upload Files" button on the top right of this webpage. |
Copyright © www.printoutlet.us
Date Updated: Sunday 26th of July 2026 02:41:51 AM